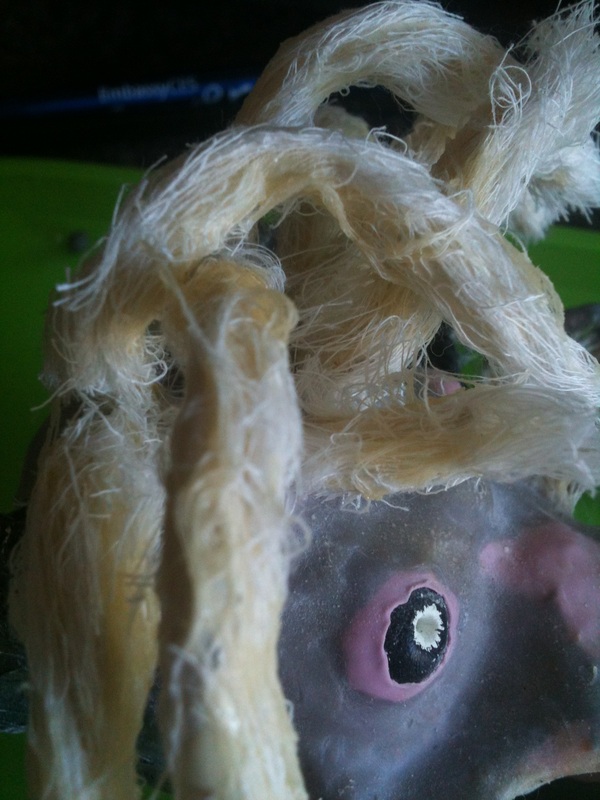
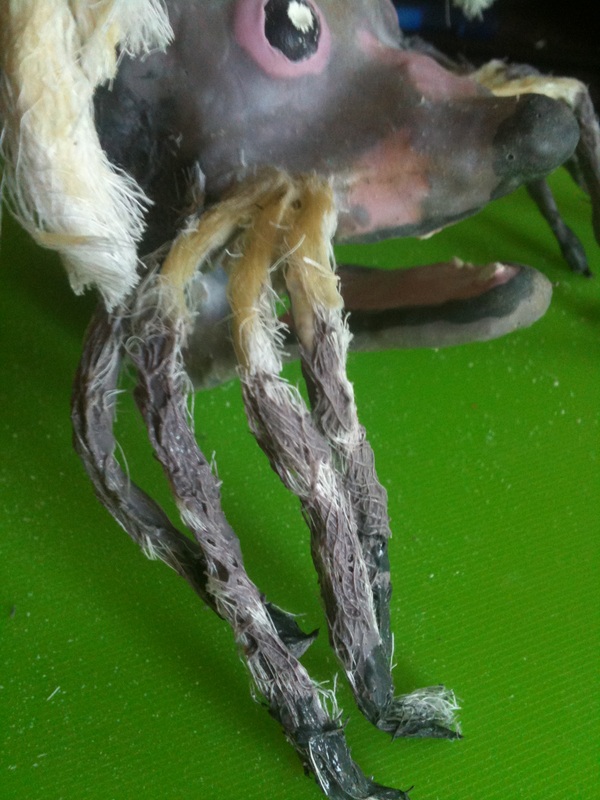
| I thought it would be nice to add 'hair' over the top of the latex where a Chinese Crested would have hair. I had some scrap bit of fabric made up of interlocking threads which when rolled into strips looked like strands of hair. I dipped these strands into yet more latex and applied them onto Jess' skin. On her beard I coloured the latex so that she would have varying shades of fur.
| |
| Close up of Jess' head hair
| Close up of Jess' beard hair
|
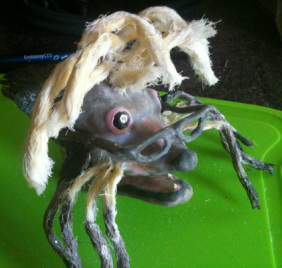
I also made her a little pair of glasses from wire, foam and latex.
Such a sophisticated pooch!
Now for her body....
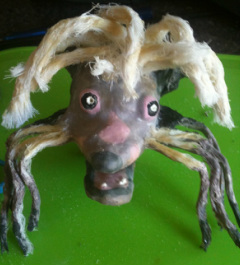
She's looking a lot better with some colour in her cheeks!
I mixed each colour in acrylic paint with latex before painting it onto her head which ensures thats her joints aren't made stiff by just painting acrylic onto her. This took me a while to do as I was working with a number of different colours I had to make sure each colour had dried before starting with the next so I didn't ruin the finish of the latex.
I experimented with a final coat of latex mixed with talcum powder. Talcum powder on its own rubbed into dry latex will give it a matte effect as dried latex is extremely shiney. This works well but once you start animating with the puppet the powder often rubs off easily with handelling, hence why I wanted to try mixing the talcum powder with the latex to leave to set. It worked to an extent by taking some of the shine out of the finish but did leave yellowed clumps where the powder hadn't seperate in the mix. Worth the try but not totally succesful!
| | Once the layer of foam and latex had dried on the armature I was able to set Jess' eyes into her head. I made her eyes out of milliput, which have two small holes that I am able to fit a toothpick into so I can move them whilst animating. These were then painted black to look like little doggy eyes. I had already created a 'socket' for them to sit in when shaping the lightweight sculpey core.
|
I coloured some latex a light pink skin colour which I then applied around the eyeball in its socket, I also painted the inside of her mouth while I was at it and once her eyes are set I can get going with a different colour!
I first applied a layer of foam and latex directly onto the skull, covering everything other than the K and S hole where her body will be attached. For the hair surrounding her mouth I sandwiched the bits of wire between two pieces of foam covered latex which I also secured to her face.
Once this was dried I was able to cut around the excess bits of foam to reveal the strands of 'hair' and also cut away the bits of foam in the mouth that had been covering her little teeth.
I then started work on the strands of wire coming out of her head. As these were all higgledypiggledy unlike the straight line of wire in the sides of her face I decided to wrap each strand with a seperate bit of foam at a time.
I'm just waiting for these bits to dry before I can start to colour her...
| | I've started work on Jess' head armature. I decided to loosely follow the rough designs I had posted up here earlier rather than spend more time on better designs first. This was mainly because I didn't really have any idea how I would attach her hair armature, so thought the best thing to do was just start making and she how it went as I went along, trial and error. I could always restart if anything goes terribly wrong, but touch wood, so far so good!
|
The wire jaw and ears attach to the light weight sculpey 'skull'.
I then started to add some facial detail with milliput, which is how I also attached the hair wires to the cheeks...
... and to the head. Jess is currently looking like she's been struck by lightning but as soon as that milliput has dried I can start to apply her 'skin' over the armature.
I want Jess to have a moveable jaw, eyes and hair, so I am creating her head seperately to her body and will attach this later with K and S. The initial idea for her head armature is quite simple as it is similar to the heads I have made in previous projects, however I am unsure of how how I will attach her hair to the skull. This is an initial design to get the old cogs in my head working. I've decided as this project is going to be experimental in it being the first time I have made a puppet like this and because I don't need to follow any strict designs, I will create her head first before designing the size of the body armature so that the body doesn't end up restricting what I want to do with the puppet as a whole.
I've started to prepare to make Jess' armature. These are obviously nowhere near the final designs but an initial look into what a Chinese Crested's skeleton looks like. I haven't made a four legged puppet before so this is quite an experiment for me!
She's now got her slap on and is ready to hit the town!.. Or more likely curl up on the sofa with a cup of tea if I know Jess at all!
I wanted to make a 3D version of my Jessica character in clay. I have decided that I will be making a stop-motion puppet of her so I firstly need to get my ideas off of the paper and into a 3D form.
Here's how it's going so far:
I created a wire structure that would support the clay, especially the wispy bits of hair above her eyes and around the mouth. I then started to build directly on top of this with the clay.
I started to mould shape into her face before adding hair onto the wire strands.
I've left the clay to dry before I can continue working on it...
Meet Jessica, the Chinese Crested with attitude. She shares a little cottage with my Grandmother Judith and her rather hairier powderpuff doggy friend Jasmine. She exudes so much character that I felt I just had to make a stop-motion character based on her!
Here are a few doodles of my hairless friend:


 RSS Feed